
Removing/Replacing Glove-Box Tips???
 09-10-2007, 11:51 AM
#1
Race Director

Thread Starter
Member Since: May 2003
Location: Paducah KY
Posts: 19,105
Likes: 0
Received 0 Likes
on
0 Posts
Cruise-In VII Veteran
Anyone have a good write-up on removing the glove-box?
I'm going to be replacing mine today and was wondering if there are any hidden tricks/tips on doing it?
Also could use info on removing/replacing glove box lock mechanism.
Thanks for any replies in advance...
I'm going to be replacing mine today and was wondering if there are any hidden tricks/tips on doing it?
Also could use info on removing/replacing glove box lock mechanism.
Thanks for any replies in advance...
Last edited by Z06-JIM; 09-10-2007 at 12:09 PM. Reason: Added more info
 09-10-2007, 07:57 PM
#2
Le Mans Master


Jim,
This is really a pretty straight forward operation. The glove box is held in by a bunch or perimeter screws, mostly across the top and one on the door jam side that goes through the right lower wing of the dash pad. The glove box side panel slides under the dash pad here, so pry out a little on the dash pad wing to slip the glove box out. I would also disconnect the connector from the back of the glove box light before you start removing the screws. You should be able to access the connector by reaching inside the glove box while it is open.
There are two 10 mm bolts in the lower hinge area of the glove box also that carry most of weight of the box. You access these two bolts through holes in the bottom of the glove box. Open it up and you will see two plastic plugs that you remove to access the bolts. A 1/4 inch drive with a long extension to reach them works well. They are a bear to get back in though.
I would recommend that you be very careful when removing the 3 or 4 screws across the top of the glove box. The upper frame of the box is quite fragile and little more than a strip of plastic that cracks very easily.
I haven't removed the lock, so I can't help you there.
Good luck... GUSTO
09-10-2007, 09:14 PM
#3
Team Owner


Compartment Replacement - IP
Removal Procedure

1.Open the instrument panel (I/P) passenger compartment door.
2.Disconnect the electrical connector from the I/P compartment lamp switch.
3.Remove the trim plugs from the bottom of the compartment door. Reach behind the compartment door and push the plugs out. Use a suitable flat bladed tool on the front side to remove the plugs, if necessary.
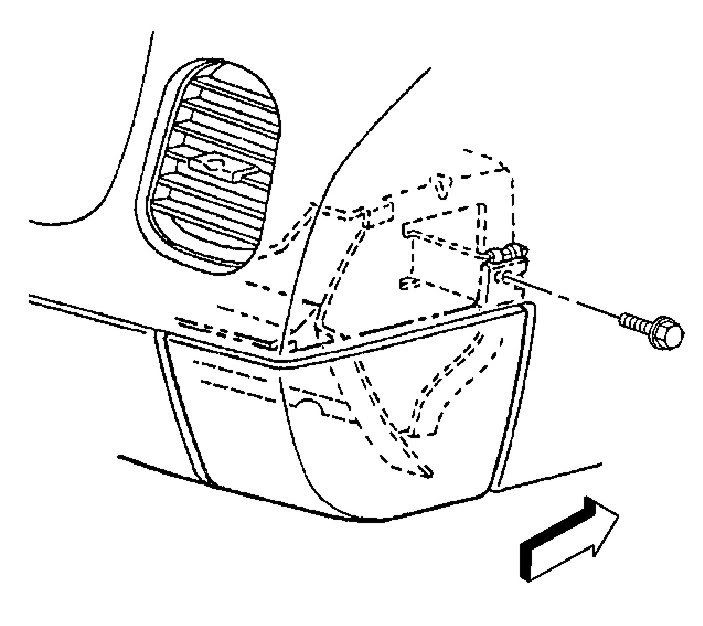
4.Remove the lower retaining bolts from the I/P compartment.
5.Remove the side and upper retaining screws from the I/P compartment.
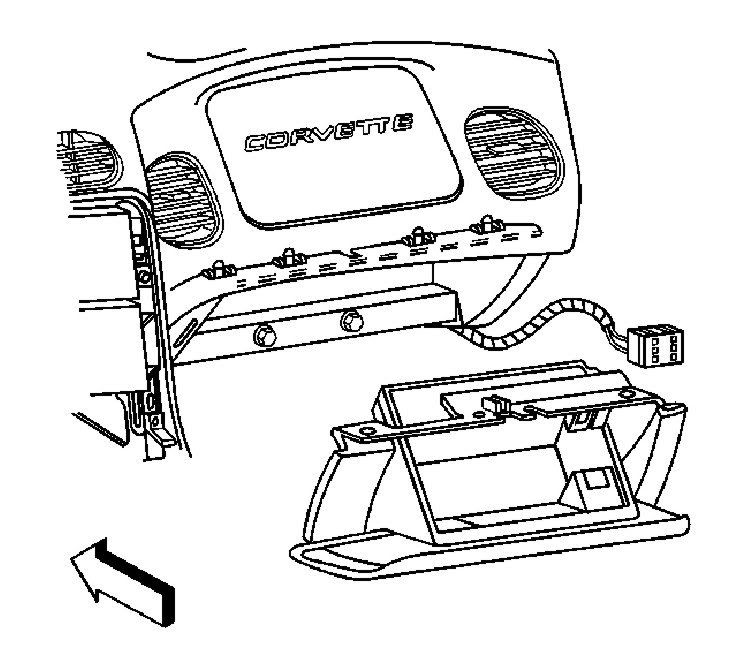
6.Slowly pull the I/P compartment just enough to disconnect the wiring harness connector from the inflatable restraint module switch.
7.Remove the I/P compartment.
Installation Procedure
1.Connect the wiring harness connector to the inflatable restraint I/P module switch connector.
2.Install the I/P compartment.
3.Loosely install the screw which retains the side of the I/P compartment, in order to align the nut on the passenger SIR bracket.
Notice
Use the correct fastener in the correct location. Replacement fasteners must be the correct part number for that application. Fasteners requiring replacement or fasteners requiring the use of thread locking compound or sealant are identified in the service procedure. Do not use paints, lubricants, or corrosion inhibitors on fasteners or fastener joint surfaces unless specified. These coatings affect fastener torque and joint clamping force and may damage the fastener. Use the correct tightening sequence and specifications when installing fasteners in order to avoid damage to parts and systems.
4.Install the upper retaining screw to the I/P compartment. Tighten
Tighten the retaining screw to 1.9 N�m (17 lb in).
5.Install the lower retaining bolts to the I/P compartment. Tighten
Tighten the retaining bolts to 12 N�m (106 lb in).
6.Align and hold the I/P compartment to the I/P, then install the side retaining screw to the I/P compartment. Tighten
Tighten the retaining screw to 1.9 N�m (17 lb in).
7.Install the trim plugs to the I/P compartment door.
8.Connect the electrical connector to the I/P compartment lamp switch.
9.Close the I/P passenger compartment door.
Removal Procedure
1.Open the instrument panel (I/P) passenger compartment door.
2.Disconnect the electrical connector from the I/P compartment lamp switch.
3.Remove the trim plugs from the bottom of the compartment door. Reach behind the compartment door and push the plugs out. Use a suitable flat bladed tool on the front side to remove the plugs, if necessary.
4.Remove the lower retaining bolts from the I/P compartment.
5.Remove the side and upper retaining screws from the I/P compartment.
6.Slowly pull the I/P compartment just enough to disconnect the wiring harness connector from the inflatable restraint module switch.
7.Remove the I/P compartment.
Installation Procedure
1.Connect the wiring harness connector to the inflatable restraint I/P module switch connector.
2.Install the I/P compartment.
3.Loosely install the screw which retains the side of the I/P compartment, in order to align the nut on the passenger SIR bracket.
Notice
Use the correct fastener in the correct location. Replacement fasteners must be the correct part number for that application. Fasteners requiring replacement or fasteners requiring the use of thread locking compound or sealant are identified in the service procedure. Do not use paints, lubricants, or corrosion inhibitors on fasteners or fastener joint surfaces unless specified. These coatings affect fastener torque and joint clamping force and may damage the fastener. Use the correct tightening sequence and specifications when installing fasteners in order to avoid damage to parts and systems.
4.Install the upper retaining screw to the I/P compartment. Tighten
Tighten the retaining screw to 1.9 N�m (17 lb in).
5.Install the lower retaining bolts to the I/P compartment. Tighten
Tighten the retaining bolts to 12 N�m (106 lb in).
6.Align and hold the I/P compartment to the I/P, then install the side retaining screw to the I/P compartment. Tighten
Tighten the retaining screw to 1.9 N�m (17 lb in).
7.Install the trim plugs to the I/P compartment door.
8.Connect the electrical connector to the I/P compartment lamp switch.
9.Close the I/P passenger compartment door.
The following users liked this post:
Sam Handwich (01-20-2022)
09-10-2007, 09:25 PM
#4
Team Owner
Lock Cylinder Replacement - Instrument Panel (I/P) Compartment Door
Removal Procedure

1. Open the I/P passenger compartment door.
2. Remove the screws retaining the passenger compartment door handle.
3. Remove the door handle.
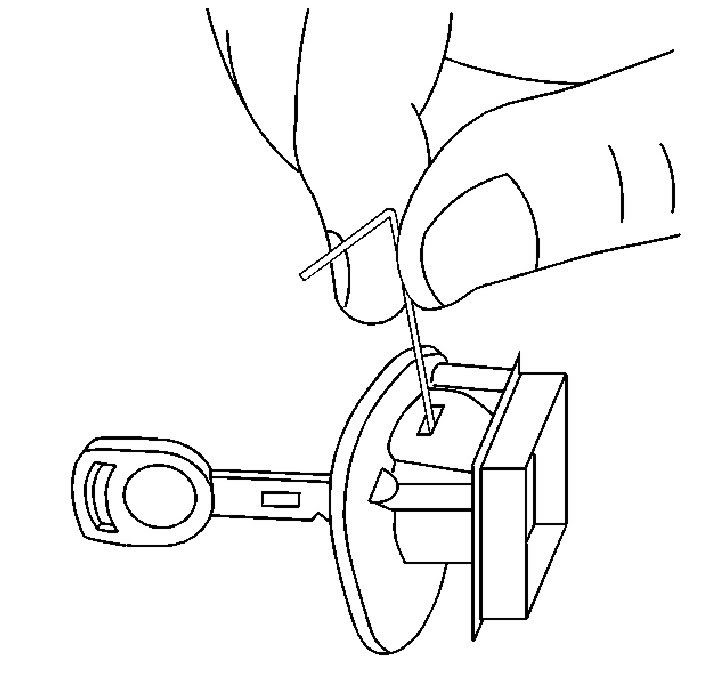
4. Insert the key into the door handle lock cylinder.
5. Turn the key 1/4 turn clockwise (LOCK position).
6. Release the lock cylinder retainer. Insert a small diameter tool into the slot on the RH side of the door handle and depress and hold the lock cylinder retainer.

7. Turn the key an additional 1/4 turn clockwise.
8. Pull to remove the lock cylinder.
Installation Procedure
1. Insert the key into the lock cylinder.
2. Insert the lock cylinder into the passenger compartment door handle. Align the lock cylinder in the same position used for removal, then push to seat fully.
3. Turn the key 1/4 turn counterclockwise to secure the lock cylinder retainer.
4. Turn the key an additional 1/4 turn counterclockwise and remove.
5. Inspect the operation of the lock cylinder. The lock cylinder should only allow a 1/4 turn and should be securely retained in the door handle.
6. Install the door handle to the passenger compartment.
7. Install the passenger compartment door handle retaining screws.
8. Close the passenger compartment door.
Removal Procedure
1. Open the I/P passenger compartment door.
2. Remove the screws retaining the passenger compartment door handle.
3. Remove the door handle.
4. Insert the key into the door handle lock cylinder.
5. Turn the key 1/4 turn clockwise (LOCK position).
6. Release the lock cylinder retainer. Insert a small diameter tool into the slot on the RH side of the door handle and depress and hold the lock cylinder retainer.
7. Turn the key an additional 1/4 turn clockwise.
8. Pull to remove the lock cylinder.
Installation Procedure
1. Insert the key into the lock cylinder.
2. Insert the lock cylinder into the passenger compartment door handle. Align the lock cylinder in the same position used for removal, then push to seat fully.
3. Turn the key 1/4 turn counterclockwise to secure the lock cylinder retainer.
4. Turn the key an additional 1/4 turn counterclockwise and remove.
5. Inspect the operation of the lock cylinder. The lock cylinder should only allow a 1/4 turn and should be securely retained in the door handle.
6. Install the door handle to the passenger compartment.
7. Install the passenger compartment door handle retaining screws.
8. Close the passenger compartment door.


